... Where the Creative Creature Within Takes Over & Makes Wonderful Things Happen

Tuesday, December 21, 2010

Puss in Boots Amigurumi

So you're probably wondering what I've been up to lately - I've been so quiet! I'm doing my very best to get all the Christmas presents I can made before Christmas!! Also today is my kids' last day of school, so I've had to work especially hard to get their things done before they're home all day :-)
Here is my latest creation:
Puss in Boots 
He's so adorable!!!
And I don't think I'll be doing him again any time in the near future!! LOL He was quite a lot of work! But it'll all be worth it on Christmas morning when my youngest son opens him up! He loves this character! He collects any one that he can find!
I saw the pattern when I was looking for the Spongebob Amigurumi - the patterns are by the same person. And I bought this one knowing I would want to make it for my baby as a surprise :-)
((please excuse the mess on my desk  - it's crunch time after all))
He is suppose to measure 11 inches tall ... but you know me by now! And from his boots to the feather in his hat, he is 18 inches tall!! He has a cape, a belt and a belt buckle and of course, a tail as well.
I love him! And my son will too!!

Thursday, December 16, 2010

Doggie Blanket

I was quite tired after making that enormous SpongeBob (lol) but somehow I still managed to whip up this Dog Blanket in one evening! I was proud of myself actually. It's just a little thing, but it's really soft and warm and I think it's pretty ... um I mean handsome :-) I made it for my brother's dog. He's a sweet little Chihuahua mix and he's naturally on the skinny side so he gets cold easily - kinda like my Wennie, but she's more on the chunky side. I always figure she gets cold easily because she's so small and close to the grown.
But as I was saying, my brother & SIL's dog is a very sweet little man and I wanted to make him something to help keep him warm. Wennie doesn't really like to cover up with her Blankies, she would rather lay on them ... and somehow that keeps her warm. Hopefully this Blanket will be big enough to cover Spencer, if that's what he prefers. I think it will be. It's made in Tan, Chocolate and Red Stripes and measures 19inches x 19inches. I like it ;-)
Wennie's a wee bit jealous ... She kinda thought I was making it for her. ((I'm actually surprising her with a new one this year for Christmas!)) Her baby Blankie has been too small for her to settle her chunky self on to, even though she tries as hard as she can to curl herself into the tightest ball she can when she lays on it. I think one the same size as Spencer's will be perfect!
Well, here it is - Spencer's Blankie!
Spencer's Blankie

Wednesday, December 15, 2010

SpongeBob Amigurumi

SO this is my latest project ... And I am over the moon about it - Really!!!!
It was such fun to do! And it was a challenge! I love a challenge!! It is also the largest Amigurumi I've completed to date - 19 inches!!!!! ((it's suppose to measure 14.5 inches, completed, but apparently my stitches got away from me LOL))
I bought the Pattern online and was so excited to see it!! On the day I was looking, it was the only Spongebob pattern available, but since then I've noticed more popping up! Well I'm perfectly happy with this one! It was fun to do, easy to follow, and he's ... just ... so ... cute!!!!!!!!!! I'm giving him to my older son for Christmas and he's going to be so excited!!!!! He hasn't seen even the pattern yet - not a picture - nothing. And when he opens it on Christmas morning - YAY!!!
It was a bit harder than anything I've done yet - I was restarting and pulling out stitches, and I must have re-sewn his eyes on 3 different times! But I got him done this morning ... And Ta-Da!! Here he is .............

SpongeBob Standing

 As you can see, he is so large, he didn't even fit into the frame! LOL But so cute! He has enormous blue eyes and pretty black eyelashes. An embroidered smile and his two front teeth sticking out! He has on his tie, of course and white socks and black shoes. :-)
SpongeBob Sitting


Here is SpongeBob Sitting and you can kind of see his shoes a little bit better. Also I think he looks so adorable sitting up!


Right now I have placed him on my computer desk, on a stack of books, with one leg propped up. Smiling at me naturally, pleased that I've brought him to 3 Dimension, where he has been made with love in each and every stitch and where he will be loved forever more. Now I shall sit back and enjoy looking at him for the rest of the day while I pop the top off a celebratory Dr Pepper. :-)

Tuesday, December 14, 2010

Adorable Little (Hand-Decorated) Purses

So Hubby & I were shopping and reached my favorite department ... The Craft Department!! Love it there so much!
We were strolling down the isles looking at this and that when we saw the most adorable set of purses! They came in bright colors and 3 to a pack! DH took one look and knew they were the perfect Christmas gifts for his nieces!! He even helped me pick out the iron-on appliques to decorate them with!

He has 3 older nieces (all the perfect age for purses) and 1 younger one, who is a little bit too young for something like that and will be getting something else. So the first thing we bought to go on them were each girl's initials.
I started on them the same night I made the Christmas Stockings  ... and well after making 4 Homemade Christmas Stockings in one sitting, I only got 1 purse finished that night! LOL  But that one was important to get finished early, because it was to be mailed to Germany where Hubby's brother is stationed. I loved making it!! And was very pleased with how it came out!
Pink Purse ~ Front

   
Pink Purse ~ Back 
It's an adorable color Pink and has Blue & White Flower Appliques. And a cute little ... squiggly thingy ;-)


And the Back has Pink & Blue Flowers, a Butterfly and a Puppy on the pocket! So cute!! I really think his niece is going to like it :-)


The next ones were done a day or two later, after I had had time to rest up a little. But because I waited a few days to work on them, again I thoroughly enjoyed the creative process of ... well creating something! And again, was very pleased with how they came out! One of my little boys even helped me select the appliques and decide where to place them.
Blue Purse ~ Front

I like the Bee hovering over the Flower on this one. And we cut the stem off one of the Red Flowers to make room for it.
(As you can see, while I was holding the purse in just the right place, my older son decided to sneak into the frame! Cute, isn't he?)


Blue Purse ~ Back


Here we added a Bright Sparkling Star & a Sun along with the Red Flowers. (And my younger son's "peace" sign. Sneaky little fellas, aren't they?) Again it's absolutely adorable!


And last, but most certainly not least, the final purse was completed!

Green Purse ~ Front
Green Purse ~ Back


At this point (unfortunately) my pack of 10 assorted appliques was winding down LOL But we still managed to come up with something cute & festive! Again the ... uh ... squiggly thingy ;-) and a pretty Red Flower and a Puppy! This niece loves animals too, just as the first one does.


And on the back a sweet Teddy Bear with a Green Bow Tie I just loved! We also have a lovely Butterfly, Blue & White Flowers (stemless again, thanks to our cunning scissor-know-how) And I plopped on a Bee ... Because I think he's cute! :-)


I really enjoyed making these! And I'm going to love seeing their little faces when they open them! These girls are very "girlie" and like purses where they can keep all their little "stuff" when they leave the house or are just playing at home. And they were really fun to make! It was a creative way to express myself - one I hadn't tried until this point, and I don't think it'll be my last! Yes ... I see Tote Bags and Shopping Bags and even more Purses in my future! :-)

Sunday, December 12, 2010

Homemade Christmas Cookies

I've always loved watching people on TV make Homemade Christmas Cookies! It seems like the perfect family Christmas-time tradition! I never have tried it before this year. When I was young, I guess it was something kids weren't allowed to do - help out in the kitchen and make a mess. When my kids were small, I guess I was doing my best to get through the holidays in one piece LOL But this year I decided to take on this project! Christmas Cookies, here I come!
Me & the kiddies went to the store and bought all the ingredients for Sugar cookies. We decided to buy the Icing in the spray tube - the one that includes 4 different decorative tips. We bought a HUGE canister of Sprinkles! And a set of 3 Christmas Cookie Cutters! We were ready!

First I mixed the cookie dough. It was surprisingly easy! I thought for some reason it would be thick and hard to mix. But it wasn't! It mixed perfect! We let it chill for about 20 minutes ... and then the boys couldn't wait any longer! We got it out, rolled out half and started cutting! The first try wasn't very good. There wasn't enough flour and I rolled it out too thin, so it was hard to scrape up and cookies. But we got 2 or 3 out of it and then rolled out some more (this time with more flour) and tried again ... So much better this time! They cut perfect! They lifted off the table perfect! It was great!
Into the oven went the first batch!
While they were baking, we got to work on the next batch. Again, these were easier and the kids had so much fun! They enjoyed the rolling & cutting part, but they were just being patient, waiting for the fun part ... Decorating!!!!


They fully enjoyed the entire decorating process! From the first time the icing squirted out across the table! LOL It was fun to smear the icing all over Christmas Tree Cookies and the use sprinkles to "decorate" the tree! And to use the icing to dot eyes and buttons onto the Gingerbread Men! We loved finding new ways to decorate each and every one. And when we were finished ... They. Were. So. Yummy!!!!!!!!!!!! The best cookies I ever had!

Thursday, December 9, 2010

Homemade Christmas Stockings

It seems like every year I buy new Christmas Stockings! No matter how hard I try, they just don't last around here! So for the past few years I've been buying the cheaper, plain ones. Usually I write everyone's name in glitter or something like that.
This year I was looking to decorate the Stockings yet again.
We just went to the Christmas Parade in our town last week and an idea hit me when I was looking to decorate them this year - The beads!! We always need something to do them after all. I hate having them around the house just making a mess.
Decorating our Christmas Stockings has become quite a tradition in our household. It's fun to do and makes them more personal. You can use anything from around your house, even if you don't have any glitter or sparkles. Any kind of ribbon, beads, buttons, bows, or sequins you have on hand will work. Just be creative and make them your own! Some imagination, a little vision, and a Hot-Glue Gun will make every Stocking unique and individual.
I think my Stockings really came out cute this year and I really enjoyed making them!


Monday, December 6, 2010

Cross-Stitch Christmas Pillow

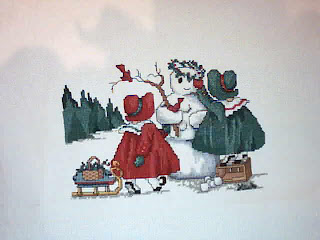
This is a project I've been wanting to do for literally years!! I made this cross-stitch picture the winter of 2004. It's been sitting in a zip-lock bag ever since. Yes, I'm a procrastinator!
But today is the day! My last day off was Friday, so I went shopping and finally bought the material for my pillow. The picture has red and green in it, so I chose a beautiful red fabric. I bought a red ruffle (no I'm not that good at sewing just yet!) And I bought a pretty strip of white lace. I knew my next day off would be today - Monday - and I set everything out to be done today!
Here I am, sewing my pillow!

I really love to Cross-Stitch!! It's one of the very first "crafty" things I learned how to do - The summer I was 12, my grandmother taught me while I was visiting her in Florida. She had a bunch of those tiny ornaments in frames, mostly birds. I was bored and complaining and she thought it would be a good way to pass my time. I cross-stitched an Owl as my very first project. I was so pleased with myself and what I could do. 2 decades later I still love to cross-stitch!
So I did my picture 6 six years ago. It's very pretty. I plan to make several seasonal pillows with cross-stitch pictures I've made over the years - all just waiting for me to do something with them LOL This will be my first project.
 
It's always best to wash your fabric before you sew anything, just in case it bleeds or shrinks, at least that's what Mrs Howard taught me (high school home ec). I of course forgot to do this over the weekend, so I did a quick hand wash in the kitchen sink and threw it in the dryer. It needs to be ironed after it comes out.
While the material is drying I pin the lace to the ruffle and sew it on.
 
It takes me hours to figure out exactly how to layer the bottom (red) material, the ruffle, and the top cross-stitch piece just so in order to get it to come out right!! But finally I figure out something along these lines:
The ruffle gets pinned lace-side down on top of the picture.
The red material (back of pillow) gets pinned on top of the ruffle.
Sew along the edge of 3 of the sides, so that you are sewing all 3 layers together in one stitch, leaving at least 1/4inch seam allowance - I left 1/2 just to be safe, considering I was having so much trouble it seemed best.
Leave one side open to stuff. It will be sewn by hand.
After stitching, turn pillow inside out and be sure ruffle is free and sticking out along the edge as it's suppose to . . . yep, this is where I had my trouble! Apparently I pinned the ruffle all the way around and had the open ends both meet on a corner - a corner that I sewed. Yeah. So my ruffle was all bunched up and sewed crooked in one spot.
I pulled the stitches just in that corner . . . . And did it again!
AHH!!!!!
I pulled the stitches again. Not so easy this time. Along the way I stuck myself with the needle right underneath my thumb nail. I cut a hole in my red material. I sewed a pin into the seam of the pillow. That's where the cut came in - I had to cut it out!
I cried.
I seriously thought about just cutting everything off and and buying more material and a new ruffle and starting it all over before I destroyed the cross-stitch piece - the one part I couldn't replace.
I finally got the dang ruffle right and . . .
put the whole thing down until tomorrow and watched a movie with hubby. It seemed like the sensible thing to do.

. . . . 3 Hours Later
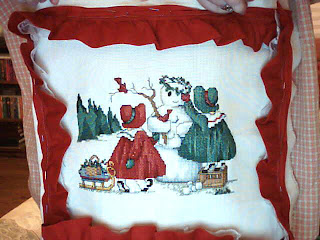
Well I decided to give it one more go before going to bed. I felt refreshed after my movie break and when looking at the pillow, I realized, there wasn't a lot left to do. And to tell the truth, I didn't want it facing me in the morning! LOL So I tried again . . . And here it is!!
              Christmas Pillow  


Certainly not my very best work to date, but not too bad considering it was my very first attempt at a pillow and I was working with no instructions whatsoever ... not even a YouTube or eHow Video! You should see my very first cross-stitch project. And my first crocheted blanket. Not too mention my first scarf! It's all about learning and practice. I'm definitely glad I tried it - and finished it!
And I will be making more in the future!


Saturday, December 4, 2010

Amigurumi Wiener Dog

This is the most adorable dog toy ever!!
I saw the pattern on the Lion Brand Yarn web page, where they have tons of great patterns! It looks like my dog Wennie, so I thought it would be a great Amigurumi to do for her. I did it in one day and it's so cute! It's easy, fast, and looks just like the expensive toys you buy in the store for your dog. You can make them any color you want, crochet a collar for it, even add a little bell if you'd like!
I plan to make a few for friends who have pets for Christmas ...

"To: SweetPea
Love From: Wennie" :-)

I think they're great! Because it's a long toy, it was a little hard for me to get a good picture with my web cam, but here it is:

Friday, December 3, 2010

Plankton

This I found and knew right away I just had to make it!!
My children are huge Spongebob fans, my oldest more so, and when he saw the picture of Plankton on a web site he said "Mama, I need that!" LOL How could I possibly say not now to that?
The good thing about Amigurumi this small is that they really can be made super quick! I made this in one evening. Pipe cleaners are needed for the antenna and for the arms - just wrap them in the yarn. Plankton's eye is crocheted and then sewn onto his body. After I crocheted the cream-colored part, I used red yarn for the pupil and a tiny bit of white yarn for the "glistening" effect. If you don't wish to sew that much however, you can always use felt and just hot-glue it on. Plankton's eyebrow is a thick piece of fluffy black yarn, hot-glued over his eyelid and his mouth is white yarn, sewn in a sort of triangle shape. His teeth are black cross-stitch thread, sewn over the yarn. The eyelid I sewed on after I attached his eye to his body - just stitched through, over and over until it covered as much as I wanted it to cover.
It sounds like an awful lot of sewing, but truthfully, it didn't seem like this much when I was actually doing it. I think anything you wanted to do with felt and hot-glue instead of yarn would make this pattern go faster and be simpler.
My Plankton stands about 4 inches tall .... and my first born son loves him!!

Thursday, December 2, 2010

Amigurumi Alien

This cute little Amigurumi Alien was one of the first Amigurumi that I ever saw. I found it at Free Amigurumi Patterns. It was cute, small, easy ... all the things I love in an Amigurumi pattern! LOL It turned out to be very simple and so adorable!
Well my oldest son saw the pattern and wanted it so bad! Of course I made it for him! The alien in the pattern I saw was used with a very light "alien" colored green. I used a very dark green (a color I had bought for some Christmas patterns I plan to do). I used white for the eyes and stitched on black for pupils with yarn. The eye stems on mine are different lengths, as the pattern suggested, giving them a bit more personality. I did have to stick a pipe cleaner into the longer eye stem though because, for some reason, that one didn't want to stand up on it's own. But it's super adorable! And did I mention easy? LOL
Cute! Have a look:

Fuzz Balls

These are so adorable! My kids love them!
I use Lion Brand Yarn Fun Fur & Festive Fur with this cute little pattern and my kids love them! At first all I had was some blue. But the blue fades from a really dark, almost black, to a light light light shy blue - it's really pretty. And the best part is, when you make your Fuzz Balls, they each look different because of the changing colors of the yarn! It's great!
I now have another color of Fun Fur that's got lighter colors in it - pink, green, purple and light blue - and am making more to go with the little village my children are creating with the ones I've already made! LOL
They're super easy, super quick and adorable! Glue some wiggly eggs on them and you're all done! you can add little hats or bows to give them each their own personality and kids love them!
Here is a pic of 2 I did today, a boy & girl couple ;-) 
(just to give you an idea of how big they are, they are each the size of a tennis ball)

Wednesday, December 1, 2010

My Attempt at a Pokemon

My youngest son loves Pokemon! He's been a fan for years! So I was pretty excited when I found a whole blog full of free patterns of Pokemon Amigurumi!!! YAY! Of course my baby wanted Pikachu right off! I mean, who wouldn't? He is the top dog after all.
Well it took me exactly 3 tries to give up!
And I'm talking crocheting the entire head and body. Pulling out all the threads (just in case you didn't know, crocheting is almost always one continuous thread all the way through a project. You can literally unravel any one of my blankets or scarves just by pulling long enough!) And starting over again. I did this 3 times!!! For some reason I just couldn't get it to come out right!?! So I decided perhaps I need a little more practice at Amigurumi before I tackle something like that. And perhaps a stitch marker. Well my sweet boy kindly choose another Pokemon that was easier for Mama to do.
See the problem with Pikachu was that his head and body were, like I said, continuous rows. But I found Pichu - which he said was his 2nd favorite!! And this one was in separate pieces. Yay Mom!!
Now I had bought the yarn specifically for Pikachu . . . so Pichu looks like Pikachu LOL But my baby is happy and that's all that matters to me! Pichu was actually very easy! It took me a few days to complete, simply because I had a lot to do in those days (the week of Thanksgiving) and couldn't devote constant time to it. But I finished it and he loves it!! And I promised I'd work on dear Pikachu and get him done as a Christmas present :-)
So here is my finished Pichu (the wrong colors, yes, but still adorable)

Tuesday, November 30, 2010

Amigurumi Birds

I was so excited about my first Amigurumi cat that I couldn't wait to do another one! So I got to searching patterns and found this adorable Bird online. They were cute and the pattern looked easy to follow so I gave it a try. ((all my beginning projects were done in cream-colored yarn because that was the only spare color I had at the time LOL Things will get more colorful as I post more pictures)) This was also when I learned how to sew Amigurumi together properly. I even bought some wiggly eyes to stick on him! And I stitched the beak on with a sewing needle and some thick cross-stitch floss. It's a little crooked, but for only my second project, I'm pretty pleased with how it came out. I plan on making a few more, in different colors, so I have a nice, adorable little family of birds to set up together. I'll update my Blog with new pictures when I get the others done. But here's the first one for now.
My 2nd Amigurumi Project.

Monday, November 29, 2010

My First Amigurumi

I know I posted this one already on my Green Journey Blog . . . and on Facebook . . . but I figure it's best to go in order and really, I'd like to document my projects from the very beginning. So if there's a little repeating, forgive me ;-) I just want to log it all in in the same place.
So this is the very first Amigurumi project I ever did. It is Miuku the Cat. Isn't it cute?!?! The pattern is free & the Link is posted. I got it via Free Amigurumi Patterns which is where I get most of my patterns. It looked easy and small and well, the perfect starter if you ask me. I was so pleased with the first few rounds when I realized I was actually making something!! WOOHOO!! I ran to the bedroom and woke up Hubby just to show him what I could do!
I had a little bit of trouble sewing it together at first, but I email a friend and she gave me instructions on how and also sent me a link with pictures. When I got confused about what kind of needle to use, she also sent me a pic of what kind to buy! LOL I looked pretty ridiculous trying to thread a strand of yarn into a cross stitch needle! I'm very thankful to my friend Tray for introducing me to this wonderful craft! And all the help she's given me through the learning process. 
So here it is! My very first Amigurumi Project! Miuku the Cat!

Welcome to my New Blog

Welcome!
I decided to start this Blog simply because of my complete obsession with crafts - namely Crocheting! My most recent love affair is with a little something called Amigurumi . . . It's. Just. So. Amazing.
Amigurumi (編みぐるみ?, lit. knitted stuffed toy) is the Japanese art of knitting or crocheting small stuffed animals and anthropomorphic creatures. The word is derived from a combination of the Japanese words ami, meaning crocheted or knitted, and nuigurumi, meaning stuffed doll. Amigurumi are typically animals, but can include artistic renderings or inanimate objects endowed with anthropomorphic features. (Wikipedia)
A friend shared a link with me one day and I really didn't think I could do it, but I gave it a try one night - and WOW!! I did a stuffed animal in one night! I couldn't believe it!! And it was so much fun! The finished product is adorable and everyone loves them! My kids have asked me to make so many! I made them 3 each over Thanksgiving Break and they have put in even more orders for Christmas LOL
Now that's another thing! These will really make great gifts for little ones ... and puppies and kittens as well! An adorable crocheted mouse can be stuffed with some catnip and it's a perfect gift for a cat. A few reinforced stitched and stitched instead of plastic or button eyes and it's a perfect gift for a puppy. Insert a rattle and there's a lovely baby toy. The possibilities are endless! As are the patterns! Of course there are books full of patterns you can buy, but there are also oodles of free patterns online! There are Blogs and web sites galore where you can find patterns and how-to's and videos! It's so great!! I have really found a wonderful hobby here - it's a passion really.
So join me as I enjoy my crafts and allow me to share with you all of my fumbles and triumphs over new projects! Happy Crafting!